AI On-Model Photos for Shopify Fashion: A Practical Workflow for PDP-Ready Images
Yes, Shopify apparel brands can turn flat-lays, hanger shots, or ghost mannequin images into usable on-model product photos with AI, but the output is only as good as the source image, the consistency of the generation setup, and the review process before publishing. The practical workflow is simple: start with a clean product image, choose a narrow model and style system, generate a small batch, review for product accuracy and catalog fit, then publish only the images that are strong enough for your product pages.
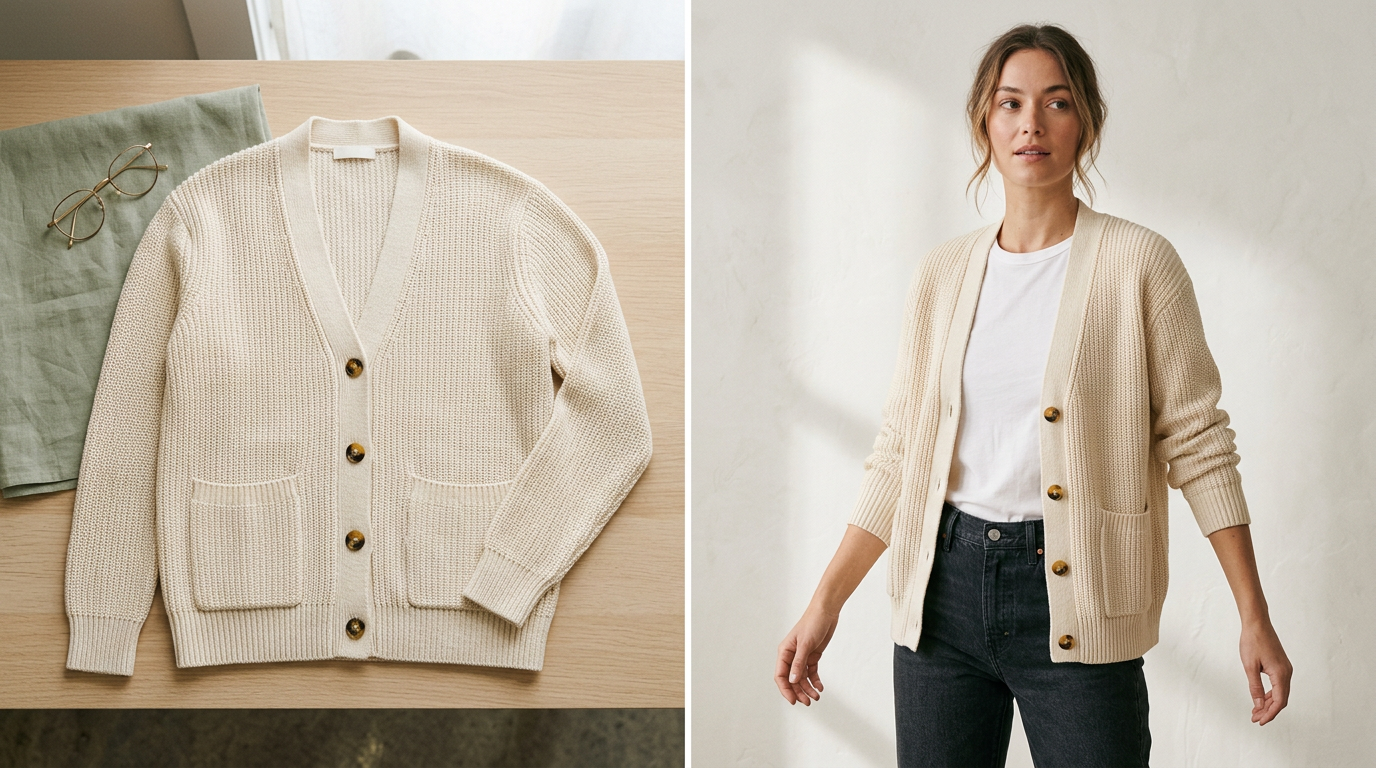 A simple flat-lay can become a polished PDP image when the source photo and visual system are controlled.
That is the real opportunity for indie and growth-stage fashion brands: not making flashy AI images, but creating repeatable product-page visuals for launches, restocks, and catalog updates without defaulting to a full traditional shoot every time.
If you are still mapping the broader category, browse more Shopify fashion visual workflow guides. For a narrower starting point, this guide on turning flat-lays into studio-style Shopify photos is a useful companion.
Where AI on-model photos fit in a Shopify apparel workflow
Many Shopify apparel teams already have product photography. What they often lack is enough consistent on-model coverage for PDPs, collection pages, launches, and seasonal updates.
That is the workflow several ecommerce-focused AI image tools now describe: upload a flat-lay, ghost mannequin, or hanger image, choose model or styling inputs, generate on-model outputs, then export the approved images for ecommerce use.
For merchants, the useful framing is operational: AI on-model generation is a way to turn existing apparel photos into more storefront-ready visuals when your bottleneck is time, catalog coverage, or photoshoot logistics.
The basic workflow: from flat-lay to Shopify-ready model photos
A practical workflow for Shopify fashion brands usually looks like this:
- Start with the cleanest possible flat-lay, hanger, or mannequin image.
- Choose a limited model set and visual style for consistency.
- Generate a small first batch for one product or one mini-drop.
- Review for garment accuracy, silhouette realism, and catalog consistency.
- Publish only the outputs that are strong enough for PDP use.
- Repeat the same setup across the rest of the collection.
This structure matches the common pattern in the category: upload the apparel image, generate model-photo variations, review the output, then publish only the versions that meet your product-page standard.
What source images work best
The starting image is usually the biggest factor in whether the final output is publishable.
In practice, the best source images have:
- a clean, simple background
- even lighting
- the full garment visible
- clear garment edges and silhouette
- minimal wrinkles that distort shape
- accurate color in the original file
- no hands, props, pins, or distracting styling elements
For a merchant, the takeaway is straightforward: you do not need a full studio shoot to test this workflow, but you do need disciplined product inputs. If the original image is badly lit, partially cropped, heavily wrinkled, or color-shifted, the output is more likely to need review or rejection.
Which products are easiest to convert
As a practical rule, this workflow is easiest when the garment is visually clear and structurally simple.
Usually easier:
- tees
- sweatshirts
- hoodies
- dresses with a clear front silhouette
- jackets with visible construction
- coordinated sets shot clearly
Usually harder:
- highly reflective fabrics
- sheer garments
- complex layered looks
- intricate draping
- unusual asymmetry
- products where small construction details are easy to distort
This section is best treated as merchant judgment, not a universal rule. The point is to review harder products more strictly before using an image in a primary PDP slot. If you are deciding between image formats, compare ghost mannequin vs AI model photos for Shopify before changing your whole catalog.
How to choose model and styling variables without creating catalog chaos
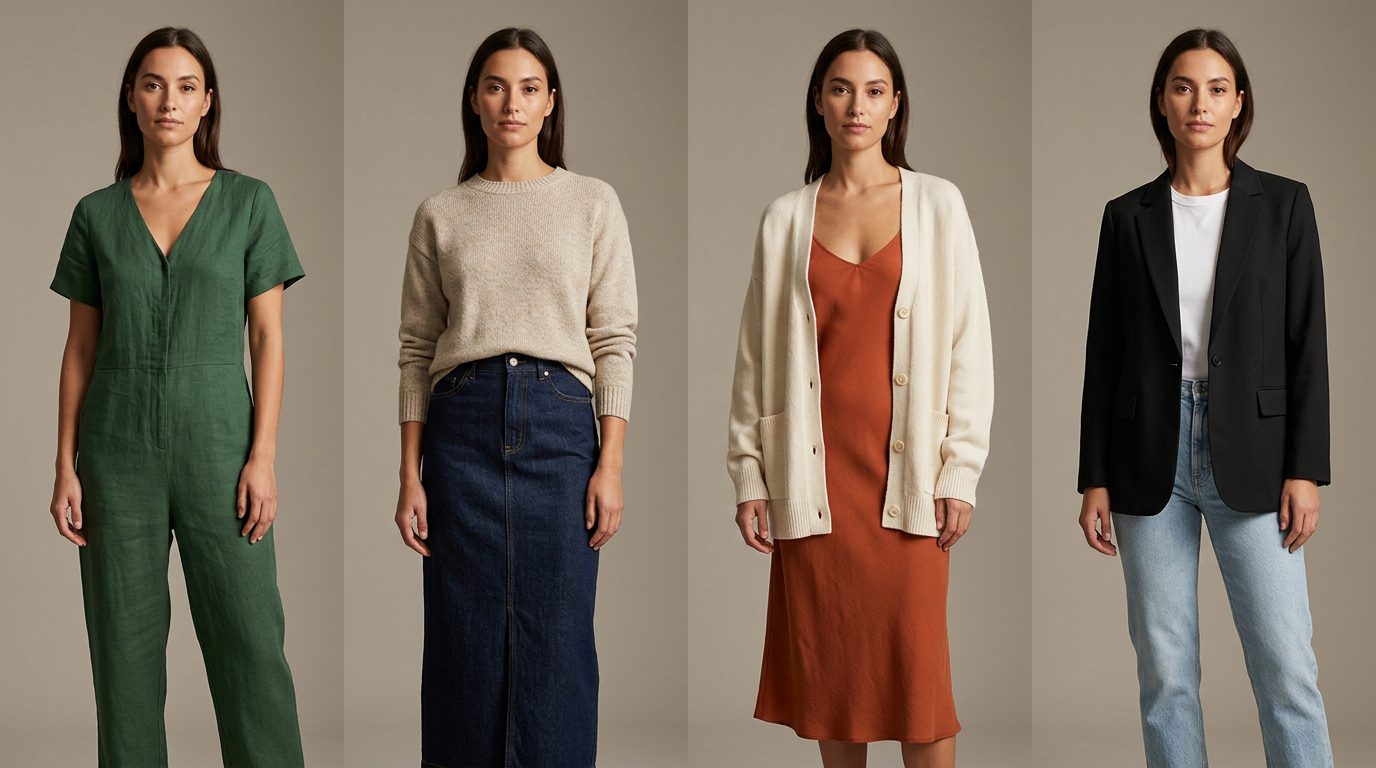 A controlled model, crop, background, and lighting system makes Shopify fashion catalogs feel more premium and easier to browse.
One of the most common mistakes is generating every SKU with a different-looking model, crop, background, and mood. A single image may look strong on its own and still make the catalog feel inconsistent.
A better approach is to lock a small visual system before you generate at scale:
- 1 to 3 core model types
- one background style for PDP use
- one lighting direction
- one crop system
- one posture range
- one color treatment
- one image ratio that fits your Shopify theme
That is the right model for Shopify product pages: consistency usually matters more than novelty. For a deeper system, read the guide to keeping model photos consistent across Shopify product pages.
A practical PDP-ready generation process
If your goal is publishable product-page imagery rather than experimental creative, keep the process narrow and controlled.
1. Test one product first
Start with one product that already has a strong flat-lay and a simple silhouette.
This helps you answer three questions quickly:
- Does your current source photography translate well?
- Do the generated outputs look credible enough for your storefront?
- How much cleanup or manual review is still required?
2. Generate a small set of variations
Instead of making dozens of very different versions, generate a tight set with small changes:
- same model, slight pose changes
- same background, minor framing changes
- same styling direction, alternate crop or angle
The smart way to scale is to establish one reliable pattern first.
3. Decide the image role before you generate
Not every output needs to do the same job.
For Shopify apparel, decide whether the image is for:
- primary PDP image
- secondary gallery image
- collection page thumbnail support
- launch creative
- email or paid social
For a Shopify PDP, product clarity should stay the highest bar.
The QA checklist before publishing to Shopify
This is the step that decides whether AI saves time or creates more work.
Before publishing an AI on-model image to a product page, check:
- Does the garment shape match the original product?
- Is the neckline correct?
- Are sleeve length and hem length accurate?
- Is the print, logo, or pattern placement preserved?
- Does the fabric texture still look believable?
- Is the color close enough to the actual product?
- Are closures, seams, straps, or trim still present?
- Are hands, hair, or pose elements covering key product details?
- Does the crop fit your Shopify theme image ratios?
- Does it look consistent next to the rest of the catalog?
If the image looks polished but changes product details in a way that could mislead a shopper, it is not ready for a primary PDP slot.
What "good enough to ship" actually means
For Shopify merchants, publishable does not mean perfect. It means the image is clear, credible, and consistent enough to support the real product.
A generated on-model photo is often good enough to ship when:
- the product is visually accurate in the ways shoppers care about
- the image matches your brand's catalog style
- it improves product presentation without introducing obvious errors
- it reduces the need for a full shoot for that SKU or restock
It is usually not good enough to ship when:
- the garment fit looks physically wrong
- important details disappear or move
- the color drifts too far from reality
- different SKUs look like they came from different brands
- you still need too much manual correction after generation
That is the real decision point. The goal is not to force every SKU through AI. It is to decide where this workflow is efficient enough and accurate enough to use with confidence.
When AI on-model photos are a strong fit
This workflow is often a strong fit for:
- new drops that need faster PDP coverage
- restocks where you already know the visual format you want
- larger catalog updates
- testing whether flat-lay-heavy PDPs need more on-model support
- teams trying to reduce the operational overhead of repeated shoots
AI on-model photo workflows are especially useful when the product inputs are already clean and the brand needs consistent imagery across many similar products.
When a traditional shoot or manual retouching may still be better
AI is not the right answer for every apparel image.
You may still want a traditional shoot, specialist retouching, or more manual control for:
- flagship launches
- brand campaigns where art direction is central
- highly technical garments
- luxury products where construction detail is critical
- products with fit-sensitive details that must be exact
- editorial storytelling where movement and set design matter
The real comparison is not "AI or nothing." It is whether AI is the best workflow fit for this product set, deadline, and visual standard.
Compared with traditional photoshoots, AI tools in this category are positioned around removing shoot logistics like booking models and producing new images from existing apparel photos. Compared with manual editing, they are framed as a faster generation workflow for catalog and ecommerce use. And compared with general-purpose creative tools, fashion-specific tools are built around apparel inputs, model selection, and repeatable catalog use cases. That does not automatically make every output publishable, which is why the review step still matters.
How to roll this out across a Shopify catalog
Once one product works, expand gradually.
Start with a small launch set
Choose 5 to 20 SKUs with similar photography quality and product structure.
Standardize your inputs
Use the same image prep rules for every product:
- same background treatment
- same lighting style
- same framing
- same file quality expectations
Create a repeatable visual system
Lock:
- model choices
- background style
- crop rules
- gallery order
- quality threshold for publishing
Review by collection, not just by SKU
A product image may look good on its own and still feel off inside the collection page. Review generated outputs in groups to catch inconsistency.
Keep originals and generated versions organized
For Shopify teams, this is operationally important. Name and store files so you can track:
- original flat-lay
- generated candidate versions
- approved PDP version
- alternate marketing crops
The larger the catalog, the more this matters.
A realistic way to evaluate tools for this workflow
If you are comparing options, do not just compare before-and-after examples. Compare the workflow.
Look for:
- support for flat-lay, hanger, or mannequin inputs
- ability to keep a consistent model and style system
- bulk or batch support if you manage many SKUs
- output quality for Shopify PDP use, not just ads
- export or Shopify-friendly workflow support
- how much manual cleanup is still required
Across the category, the recurring promise is consistent: upload an apparel image, choose model or styling variables, generate on-model outputs, then use the approved images in your ecommerce workflow. That is useful category evidence, but it is still worth testing on one product or a small launch set before changing your broader catalog process.
Tiny Lemon fits this workflow for Shopify fashion brands that already have flat-lays, hanger shots, or supplier product images and want to turn them into cleaner on-model photos for PDPs, launches, restocks, and catalog updates. The goal is not to replace every shoot or approve every AI output automatically. It is to give small apparel teams a repeatable way to test real SKUs, review generated images carefully, and publish the versions that are accurate enough for their storefront.
Final takeaway
AI on-model photos can be a practical way for Shopify fashion brands to turn existing flat-lays into product-page-ready visuals if the workflow is controlled. The strongest process is usually not "generate more." It is "start with cleaner source images, limit your visual variables, review outputs like a merchandiser, and only publish what is accurate enough for real storefront use."
For indie and growth-stage brands, that is where the workflow becomes valuable: faster visual coverage for launches and catalog updates, with a lower operational burden than organizing a full traditional shoot for every product.
If you already have flat-lays, test this workflow on one product or a small launch set first. That is usually the fastest way to see whether your current images can become cleaner, more consistent Shopify-ready model photos without committing to a full reshoot.
Frequently asked questions
Can AI really turn a flat-lay into a usable Shopify product photo?
Yes, in many cases. Most tools in this category follow a similar workflow: upload a flat-lay, hanger, or mannequin image, choose model or styling variables, generate on-model outputs, then use approved images in Shopify or ecommerce workflows. The important limit is that not every generated image is ready to publish, so review is still necessary.
What kind of source images work best for AI on-model generation?
Clean, evenly lit flat-lays or hanger shots with the full garment visible tend to work best. Strong source images make it easier for the generated output to preserve the garment's shape, color, silhouette, and construction details.
Can AI on-model photos replace every fashion photoshoot?
No. They can be useful for launches, catalog updates, and restocks, but some products still benefit from traditional shoots or manual retouching, especially hero launches, complex garments, and campaign creative.
How do I know if an AI-generated image is good enough for a PDP?
Check whether the garment shape, color, print placement, trim, neckline, sleeve length, and hem still match the real product. If the image looks polished but changes details in a way that could mislead shoppers, it should not be used as the primary PDP image.